Exploring the Next JS App Router
#typescript
#nextjs
#react
Fambegbe Olamileke. Aug 21, 2024
Next JS is the most popular React framework today. It is a full stack framework that makes it possible to build front end applications in the browser while also being able to expose API routes to perform operations server side. It leveraged and extended React to make models and paradigms possible which would have otherwise been impossible.
Introduction
Pure React applications are client side rendered. This means that the Javascript for one's application must be downloaded by the browser before any sort of rendering begins. It returns a skeleton of a HTML file containing links to Javascript files which are then downloaded by the browser and used to render the content. The application is 'rendered' in the browser (client) hence the term client side rendering. This model is fine for dashboards and internal applications for which SEO (Search Engine Optimization) is not a concern. For SEO optimized applications a HTML file complete with all the needed content is required to be returned to the browser. This posed an issue with React when rendering pages that needed to be SEO optimized and whose content could only be known at run time. Say for example a blog post page whose content was fetched when the route matched its slug. The client side rendering model is just utterly incompatible with this. This is where Next JS came in. It reeplicated the server side rendering capabilities offered by full stack frameworks like Laravel, Django and Express while also making possible new paradigms like static rendering popularized by frameworks like Gatsby. It made it possible to build SEO optimized applications with React by being able to query APIs for dynamic content, render the page on the server before returning the complete HTML to the browser. One could also build pages statically at build time (for content that rarely changed for example blog pages, landing pages and similar). This had the added advantage of being faster to load (performance wise) than server side rendering because there wasn't the added latency of querying an API for content. If so desired, one could even combine server side rendering and static rendering with a special feature of Next JS called Incremental Static Regeneration (ISR) in which pages could be statically built and when rendered, a request is made in the background to fetch the latest content and swapped out with the current content on the page. Next JS was able to make this functionality possible by providing its own API that exposed several special functions (getServerSideProps, getStaticProps). This was due to the fact that React on its own was limited to client side rendering as explained above.
Server Components
React 18 introduced React Server Components (RSCs) which are components that are rendered on the server. This was a gamechanger in the sense that it unlocked a new set of possibilites for React. These components could query for information on the server side and render their HTML completely on the server before being returned to the client.
import { Nav, Category } from '../components';
import { getCategories, getArticles } from '../api';

export default async function Page() {
    const categoriesData = getCategories();
    const articlesData = getArticles({ page: 1, count: 10 });

    const [categories, { articles, pagination }] = await Promise.all([
        categoriesData,
        articlesData,
    ]);
    const activeCategoryIndex = categories.findIndex(({ slug }) => slug === '/');
    categories[activeCategoryIndex] = {
        ...categories[activeCategoryIndex],
        is_active: true,
    };

    return (
        <>
            <Nav categories={categories} />
            <Category articles={articles} pagination={pagination} />
        </>
    );
}
As we can see from the example above, you simply fetch whatever data you need and return your JSX using the fetched data. This was previously unheard of in React. One would need to have performed the data fetching in a useEffect and display a loading state while it was being fetched. Tools like React Query simplified the process and eliminated the need for useEffects but we still had to follow the paradigm of the application's Javascript first being downloaded and the DOM being rendered (hence the need for a loading state) before data fetching could occur. Server components eliminates all this and makes it possible to fetch data and render on the server with the exact needed data.
React 18 also introduced server actions which basically are functions that run on the server. They can be used to mutate data for example with form submissions and also to query for information to return to the client (browser). They are basically normal Javascript functions annotated with the 'use server' directive on top of them or at the top of the files in which they are defined (this turns all the functions defined in the file to server actions). They can be used as handlers for browser events (clicks, hover, form submissions), in useEffects or called like typical functions in normal program execution.
// subscribe server action
'use server';

import { subscribeGuest } from '../../api';

export const subscribe = async (formData: FormData) => {
    const subscriberUuid = await subscribeGuest(
        String(formData.get('email'))
    );

    if (!subscriberUuid) return 'There was a problem completing the action';

    return 'You are subscribed successfully!';
};
Basically, React which used to be strictly client side was extended to also run on the server. Also, with server components and actions operations like database access have become extremely easy. One could query the database directly for content and render the page with the content on the server. On form submissions, one could also perform a direct INSERT statement into the database in a server action without needing to make a call to an external API as was the norm. Now whether one should directly access the database from the frontend is a topic of great debate but the fact is that it's quite possible to do so now and is also relatively safe because the code is running on the server where the possibilty of it being an attack vector is greatly reduced.
Before React 18, Next JS applications were built with the pages router. The pages router exposed the getServerSideProps method for fetching data on the server (server side rendering) and the getStaticProps method for statically building pages at build time (static rendering). However With React components being able to render natively on the server via server components, the getServerSideProps and getStaticProps methods were redundant and a different router leveraging server components was introduced (app router).
Background
I first picked up Next JS in 2021 for a project at work and since then I have built a fair few applications with it. I had been hearing about the app router for a while, server components, all the different buzzwords without fully understanding what it was all about. I had listened to a few syntax.fm podcasts about it (here and here) but all the pieces still did not fit in my head. As a result, I decided to embark on a project to upgrade my blog (this blog you are reading) to the new app router and fit all the pieces in my head along the way (project based learning is the way to go anyways). I had originally built this blog using the pages router in early 2021 making use of getServerSideProps to fetch data for each page dynamically per request. I had intended to convert it to static rendering with getStaticProps but somehow, I never got around to that. I figured as part of the upgrade, I would just do that conversion from SSR to static rendering. Here is a link to the github repo if anyone wants to skip ahead and have a look at the code. And of course you are reading this article on the upgraded blog. In this article I'll be exploring the app router, its key features and how it differs from the pages router.
The App Router
The app router was first introduced in Next JS 13. It's built on top of server components and makes use of it to server render (dynamic rendering) and statically render pages. One of the first changes to note in the app router from the page router is how routing is performed. The pages router makes use of a file based routing system in which each file in the pages directory represents a unique page in the application (apart from reserved pages like _document.tsx or _app.tsx). The app router however makes use of a folder based routing structure in which each folder represents a particular page or api route in your application. The folder contains several special different files that Next JS looks out for and uses to build the component tree of the page. These files are
- layout.(js | jsx | tsx) - This represents the parent component for a route where shared UI is placed. For example, a dashboard application will typically feature the same header and sidebar across all the pages. The header and sidebar can be placed in a layout component and the unique page being viewed will be passed in as a children prop (page.tsx). The layout.tsx file is not required for each route (folder) but there must be at least one layout.tsx file at the root of the app router which will contain the HTML and body tags (needed so as to have a valid DOM tree for the app).
- template.(js | jsx | tsx) - To explain this it is important to point out that the layout component preserves state and does not re-render across multiple pages. When navigating from one page to another that shares a parent layout, the layout does not re-render. It's basically the same instance of the layout component used in the different pages. This may not be the desired behavior for your application and you might want re-renders on each navigation so as to for example log analytics to an external service. The template component is perfect for this. It basically performs the same function as the layout component except that unlike the layout component it re-renders across different pages and state is not preserved. However, as stated above, a layout is required in the root of the app router. With subsequent folders, a choice can then be made between layouts or templates.
- page.(js | jsx | tsx) - This represents the unique UI for a particular route. Layouts/templates are shared across their nested child components but this file contains UI/content that uniquely differentiates it from other routes.
- loading.(js | jsx | tsx) - This is used for lazy loading of pages. For example a page that is used to display user details for possible editing. While the user details are being fetched, the loading component (skeleton loaders to give an example) is displayed. It's basically the fallback passed to the suspense boundary which wraps the page.
- not-found.(js | jsx | tsx) - This represents the UI displayed when the special notFound function is thrown in a route and its nested children. It's basically the 404 UI. If not specified, the default 404 UI from Next JS is used.
- route.(js | ts) - This is used to define a folder segment as an api route instead of a UI route. Next JS is a full stack framework and as such can be used to render UI's and also define endpoints to be executed server side. The endpoints can be of any HTTP method type (GET, POST, PUT, PATCH, DELETE). A route must either be UI or an endpoint. This means that it is impossible to have both page.tsx AND route.ts defined in the same folder.
- error.(js | jsx | tsx) - This represents the UI displayed when there is a runtime error within a route and its nested children. It is the fallback passed to the error boundary which wraps the page. Next JS passes to it an error object representing the thrown error and a reset method which can be used to re-render the page. I found this particularly to be very interesting and handy because it means that if a page were to break for whatever reason, this method can be used as an onClick handler on a button to re-render it.
- global-error.(js | jsx | tsx) - Error boundaries can only be used to catch errors in their child components. Hence any error boundary defined will never be able to catch errors thrown in the root layout (remember this is required in the app router). That is where the global-error boundary comes in. It wraps the entire application and its component is swapped out with the root layout and displayed when an error is thrown. Seeing as it replaces the root layout which must contain HTML and body tags, and the application needs to have a valid DOM tree, the global-error boundary must contain HTML and body tags like the root layout.
- default.(js | jsx | tsx) - This is used in parallel routes as the fallback when Next JS cannot determine what content from the different slots to render after the page is reloaded. Read more on parallel routes here in the Next JS documentation.
Here is a representation of the component hierarachy for the different files as taken from the Next JS documentation.
<Layout>
    <Template>
        <ErrorBoundary fallback={<Error />}>
            <Suspense fallback={<Loading />}>
                <ErrorBoundary fallback={<NotFound />}>
                    <Page />
                </ErrorBoundary>
            </Suspense>
        </ErrorBoundary>
    </Template>
</Layout>
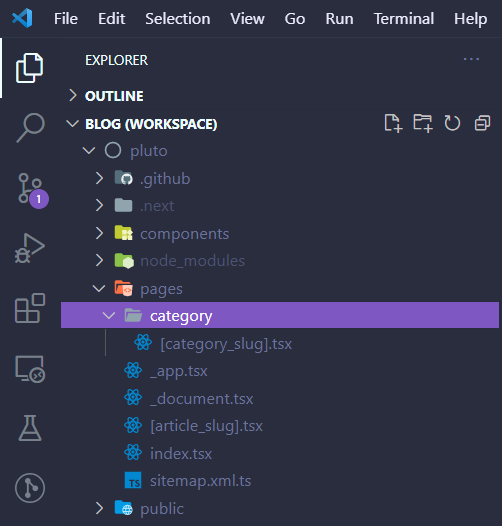
Here is what the routing structure for this blog looked like with the page router
And this is what it looks like after converting to the app router
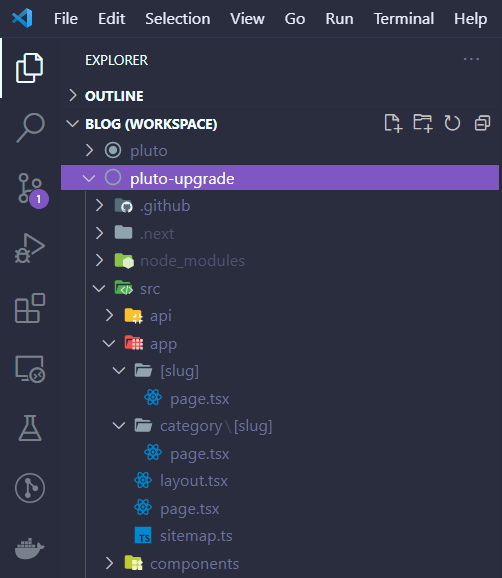
As one can see, with nested routes, the app router also works a bit differently to the pages router. In the pages router, a dynamic category page used to display the posts under a particular category (/category/guides, /category/side-projects) would have the format /pages/category/[category_slug].tsx. In the app router however, this same route would have the format /app/category/[slug]/page.tsx. Other examples of route conversions from the pages router to the app router are
- /pages/[article_slug].tsx (/my-first-article, /my-second-article) becomes /app/[slug]/page.tsx
- /pages/portfolio/web.tsx (/portfolio/web) becomes /app/portfolio/web/page.tsx
- /pages/[category_slug]/[slug].tsx (/guides/my-first-guide-article, /side-projects/my-first-side-project-article) becomes /app/[category_slug]/[slug]/page.tsx
Read more on routing in the Next JS documentation here.
Data Fetching
It is important to make a distinction between data fetching on the server and on the client. For data fetching on the server, Next JS offers two options
- Using the native fetch API
- ORMs and Database clients
With the Fetch API, Next JS builds upon and extends it to provide a set of options with which individual fetch requests can be setup.
// standard fetch request
const data = await fetch('https://example-api.com').then((res) => res.json());

// extended fetch request with Next JS
const data = await fetch('https://example-api.com', {
    cache: 'force-cache',
}).then((res) => res.json());
To explain this, its important to point out that the pages router was very explicit in defining whether pages were statically rendered or server rendered (dynamic rendering). By simply going to a page and seeing no api call or a getStaticProps method defined, one would immediately know that the page was statically rendered. Or in seeing a getServerSideProps method defined, one would immediately know the page was dynamically rendered. The app router however is a bit more implicit. Next JS analyzes each route to determine if it should statically render it at build time or render it anew everytime the route is requested. This is where the fetch API options come in. With it we can do things like define the caching behavior for a specific fetch request as seen in the example above with the cache option. By default, fetch requests are not cached and cause the entire route to be dynamically rendered at every request. To force the request's response to be cached, we can set the cache option to 'force-cache' like above. We can also cache the request initially and then get its latest contents at a later time in a process known as revalidation. Revalidation can be either time based or on-demand. With time-based revalidation, we want the latest contents fetched at specific intervals and this can be configured for a specific fetch request like this
// revalidate this request every day
const data = await fetch('https://example-api.com', {
    next: { revalidate: 86400 },
}).then((res) => res.json());
With on demand revalidation, we want the latest contents to be fetched when we desire. Say for example, when a statically rendered blog post's content is updated in the CMS. Without revalidating, visitors to the blog will continue to see the old content. It can be configured like this
const data = await fetch('https://example-api.com', {
    next: { tags: ['example'] },
}).then((res) => res.json());
This specific fetch call can then be revalidated by calling revalidateTag with 'example' passed to it like this.
'use server'

import { revalidateTag } from 'next/cache';

export async function exampleServerAction() {
    revalidateTag('example');
}
We can also revalidate all the fetch calls in a specific route by calling revalidatePath.
'use server'

import { revalidatePath } from 'next/cache';

export async function exampleServerAction(path: string) {
    revalidatePath(path);
}
On demand revalidation is typically done in route handlers and server actions.
On the server, we can also access the database directly via ORMs and other database clients. Simply import the particular package, execute your query and return the data to be used. An issue to note with this pattern is that there may be situations in which the same data is needed in different components for example in both layout.tsx (to generate the page metadata, see the Metadata API) and in page.tsx to actually render the page's content. Ideally, we do not want to be accessing the database twice directly since it's exactly the same data being obtained. For this, React provides the cache method with which we can memoize requests for data. For example, see this prisma query to return a blog post by its unique slug.
import { cache } from 'react';
import { PrismaClient } from '@prisma/client';

export const getPostBySlug = cache(async (slug: string) => {
    const prisma = new PrismaClient();
    return await prisma.post.findUnique({ where: { slug } });
})
In the example above, even if the function is called 2, 3 or 4 times in the same render, the database is accessed only once. Subsequent calls simply return the cached data.
An important thing I would like to point out is that one is not restricted to the Fetch API or ORMs and Database clients for fetching data on the server. Any of the current and popular data fetching libraries would work. The only difference is that what the Fetch API and ORMs allow us do is control the caching of the fetched data and revalidation (particularly with the Fetch API). This means that without using a data fetching library that exposes the Fetch API (Apollo client for example does this - here ) we cannot leverage the full caching and revalidation power of Next JS in server components.
On the client, the most popular and commonly used data fetching libraries can be used (Axios, React Query, Apollo Client) just as they are currently used. Some of these libraries already have their internal mechanisms for caching of data and purging and updating of these caches. They continue to work in the same way on the client in the app router.
It's also important to point out that data fetching can also be carried out on the server via the client with server actions. The advantage of this approach is that it prevents sensitive information such as api keys from being exposed in the browser. The requests run on the server and as such cannot be inspected. I made use of this to implement the 'Load More Posts' functionality on the blog. The data request is made in the server action and the new posts are returned to the component where the state is updated. The component then re-renders to reflect the new posts.
'use server';

import { getArticles, getCategoryArticles } from '../../api';

export const fetchMoreArticles = async (variables: {
    page: number;
    slug?: string;
}) => {
    const { page, slug } = variables;
    const response = slug
        ? await getCategoryArticles({ category_slug: slug, page, count: 10 })
        : await getArticles({ page, count: 10 });

    if (response.pagination.currentPage > 1) return response;

    return null;
};
Client Components
Before the introduction of server components, all components in React were client components. They are components that can use state, listen for effects and other events. They are rendered in the browser and have access to the window object, DOM and browser APIs. In the app router all components are server components by default. To make a component a client component, it must be annotated with the 'use client' directive.
'use client';

export const ClientComponent = () => {
    // return JSX
    return '...'
}
I should point out though that not every client component must have the 'use client' directive. The directive is needed for the first component in the component tree that is to be a client component. This component is referred to as the 'client boundary'. It is the boundary between the server and the client because it represents the point where rendering ends on the server and begins on the client (browser). Next JS treats all subsequent child components of the client boundary as client components. This effectively means that server components cannot be nested in client components. Only client components can be nested or be children of server components.
In situations in which client components must render a server component, the server component can be passed as a prop to the client component.
'use client';

import React from 'react';
import { ServerComponent } from '../ServerComponent';

export const ClientComponent = () => {
    // This would not work and would throw an error
    return <ServerComponent />
}

export const ClientComponent = ({
    ServerComponent,
}: {
    ServerComponent: React.ReactNode
}) => {
    // This would work
    return <div>{ServerComponent}</div>;
};
It essentially works like this - server components are the parent components used to fetch data, either directly from the database or from external APIs. The parent component then renders server and client components which make use of the fetched data. We can see this paradigm in action in Next JS with layout.tsx and page.tsx by default being server components. It is recommended to keep client boundaries as low as possible in component trees because with more of the components being rendered on the server, it reduces the amount of Javascript that the browser has to download when rendering on the client.
Concluding Thoughts
Initially, and just like with anything new, it was a bit of a learning curve picking up the app router. There's been quite the discourse about it online with opinions about it being quite diverse. After getting to grips with it, I actually came to enjoy it. I think it simplifies the process of building server rendered and statically rendered apps. I also like how the server components paradigm was introduced natively into React. Unlike before when Next JS had to do a lot of Next JS specific things to make its functionality possible, now things are being done in a much more native 'react-ey' kind of way. It's a new mental model to pick up so I understand how people might be put off by it. The previous paradigms had been in place for years so people are already entrenched into them but in time I think everyone would agree that this has been a step forward in the React ecosystem. The code for this app router upgrade can be found here and of course you are reading this article on this blog built with the app router.
Share this article
More from guides